Wednesday, January 29, 2014

Register and Download Books Using Kindle for PC While Behind Proxy

Yes, this is another story of proxy workarounds. If you're interested in my other exploits, you can read them here, here and here

A little background. I have several Kindle ebooks that I can read using my mobile phone and my pc at home. Now, I wanted to read here at work but I can't seem to register and download my ebooks, so here's what I've done to overcome this limitation.

1. Of course, I installed Kindle for PC (K4PC). My OS is Windows 7 but I think if you're using another OS, you can "translate" these instructions compatible for your OS.

After downloading the app, I tried to register it to my account but I got this error: Unable to connect at this time. Please try again later.

Not surprising, since I know I'm behind a proxy. I checked if the app has settings for proxy and it has one. To open the proxy settings, click Tools > Options > Network.

I chose Manual proxy configuration since I know my username and password. After saving the settings, I tried registering again and I got this error: Registration timed out. Please try again [1000]

Which is weird since I know I have internet connection and I have filled up the proxy setting properly. I googled kindle for pc proxy and found out that many people have this same dilemma and most of them came to the same conclusion as I did: You cannot use your Kindle (pc or otherwise) when you're behind a proxy. 

Then I stumbled upon Scott Offen's post on Registering Amazon’s SendToKindle Behind A Proxy. Now I'm not familiar with SendToKindle app but then since he solved his Kindle-related problem, I decided to give his solution a try.

His solution is actually simple: use Cntlm proxy. You can read the technical description from its official sourceforge site but for the non-geeks out there, basically Cntlm is a proxy for your proxy.

I'm not a newbie with this application/service. As a matter of fact, I have already used it for downloading gems for my Ruby on Rails in Ubuntu while behind proxy. My previous post details on how to use Cntlm in Ubuntu, we can use the same steps here while using Windows 7.

2. Install Cntlm.
3. Open cntlm.ini using your favorite text editor. You can find it in this path: C:\Program Files (x86)\Cntlm (or depends where you installed your Cntlm).
4. Edit the Cntlm configuration. Enter your username, domain and parent proxy as basic settings. DO NOT enter your password. 
5. To hash your password: 
- Open a command prompt. 
- Go to your Cntlm installation folder by typing: cd C:\Program Files (x86)\Cntlm
- Type: cntlm -v -H -c cntlm.ini
- Enter your password for your proxy and jot down the generated PassLM, PassNT and PassNTLMv2.
- Open cntlm.ini again and enter the generated PassLM, PassNT and PassNTLMv2 to their respective fields. Then save your new settings.
5. Run Cntlm service. You can:
- Click Start > Windows Control Panel > Administrative Tools > Services. Start Cntlm Authentication Proxy service. (Shortcut: Open search/run textbox, type services.msc) OR
- Open command prompt as Admin and type net start cntlm (to start the service) or 
net stop cntlm (to stop the service).
6. FINAL STEP: Open Kindle's network connection settings (Tools > Options > Network), choose
Manual proxy configuration. In HTTP Proxy field, type: localhost and in the Port field: 3128. Leave the other fields blank.

That's it. Register your K4PC and start downloading your books. 

Happy reading! 
Monday, November 19, 2012

Uninstalling Ruby on Rails in Ubuntu Manually

Only do this if you installed RoR from Source.

It's playtime! Last week, I blogged how I was able to successfully install RoR from source despite several issues encountered. Now, I'm going to uninstall RoR manually. Most of you might think my previous adventure rendered some of my screws loose. Perhaps a little (hehe) but I assure you everything I type here is thoroughly tested so proceed at your own risk. ;)

I reason I have the guts to do crazy stuff is because I'm running Ubuntu in VM so I don't care much if I wreck numerous instances (which I did for the entire duration of my RoR installation journey) because I could easily reinstall Ubuntu. But this action has become tiring and very annoying. I admit I'm a newbie at both Ubuntu and Ruby and I'm doing this for educational purposes only. It's hitting two birds with one stone: I learn how to use Ubuntu (the terminal commands stuff) while experimenting on RoR installation.


According to Ruby homepage, there's three ways to install Ruby:

1) Compiling from Source 
    - We're done with this option.

2) Using third party tools (like rvm and rbenv)
    - I'm planning to use rvm for my next RoR installation attempt. If I'll have some spare time I might also use rbenv and maybe I'll do a post about which of the two is easier to use from a total beginner's perspective. Don't hold your breath though.

3) Using package management systems (like apt-get, aptitude and yum)
    - I'd read several articles/posts that warns against using this option (Ryan Bigg's guide comes to mind). I'm not going to push my luck and I'm going to follow their advice and be a good girl. After all they know what they're saying right?

This also translates that there are also three ways to uninstall Ruby: manually (refer to post below), using rvm (rvm uninstall version_number) and using apt-get (sudo apt-get purge ruby).


Without further ado, let's start.

The sequence we installed RoR last time was Ruby + RubyGems + Rails. We're going the opposite way in uninstalling: Rails (with dependencies) first, then RubyGems and Ruby.


To uninstall Rails + all dependencies:

gem list --no-version | xargs sudo gem uninstall -ax

I got this one-liner from James McGrath's post. If you want to know the meaning for each switch used, he explained it very well in his post.


To uninstall all gems except for one:

gem list --no-version | grep -v rails | xargs sudo gem uninstall -ax

This will uninstall all gems (Rails dependencies and other gems installed) except for Rails (remember Rails is also a gem).


To delete only the old versions:

gem clean


To uninstall specific gem:

sudo gem uninstall rails

This will uninstall Rails gem only.


To uninstall RubyGems and Ruby (in one sweep):

sudo rm /usr/local/bin/{ruby,irb,gem,testrb,erb}
sudo rm /usr/local/lib/libruby-static.a
sudo rm -r /usr/local/lib/ruby/


To check:

whereis ruby
whereis gem


Wednesday, November 14, 2012

VirtualBox: Enable Shared Clipboard (Copy - Paste) From Host (Win 7) to Guest (Ubuntu 12.04) and Vice versa

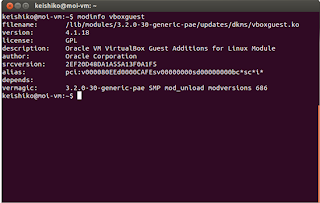
1. Check if you have VirtualBox Guest Additions installed.

Open Terminal (Ctrl  + Alt  + T)
Type modinfo vboxguest


If VirtualBox Guest Additions is already installed, proceed to step 3.

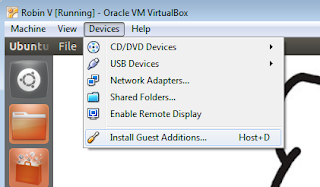
2. Install VirtualBox Guest Additions


3. Enable Shared Clipboard.

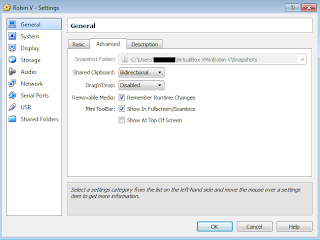
Machine > Settings > General > Advanced

In Shared Clipboard, choose whichever option you need. I chose Bidirectional for seamless copy - pasting. You can also enable Drag 'n Drop if desired.

image-705623.png (320×240)

Then reboot. Type sudo reboot

Tuesday, November 13, 2012

Solution to “ruby installation is missing psych” Error

To save yourself from this headache, install yaml first before installing Ruby. 


I'm still trying to install Ruby on Rails on Ubuntu 12.04 and I got this warning after I installed RubyGems:

It seems your ruby installation is missing psych (for YAML output). To eliminate this warning, please install libyaml and reinstall your ruby.

I googled this error and it seems several people had this problem too. A bug??? Yep. (If you're installing Ruby from rvm, refer to thisthis and/or this) Unfortunately, their solutions won't work for me because I'm installing Ruby from source not from rvm. So I decided to follow the instruction please install libyaml and reinstall your ruby and prayed it'd work.

I installed libyaml:

tar -xvzf yaml-0.1.4.tar.gz
cd yaml-0.1.4/
sudo ./configure && sudo make && sudo make install

Then "reinstalled" Ruby from Source:


wget http://ftp.ruby-lang.org/pub/ruby/1.9/ruby-1.9.3-p327.tar.gz
tar -xvzf ruby-1.9.3-p327.tar.gz
cd ruby-1.9.3-p327/
sudo ./configure && sudo make && sudo make install

When I typed gem -v, I still got the same error. :( I googled for the error and found this SO answer as my saving grace.

I recompiled yaml module:

cd ruby-1.9.3-p327/ext/psych
sudo ruby extconf.rb
sudo make && sudo make install

Judgement time. *drum roll*  To test, I typed gem -v

Aaaaaaaaaannnnnndddddd no error. I got my gem version: 1.8.24. Yipee. :)

Sweetness... 


A little explanation for myself (and to others who are curious):
## recompiles yaml or any other module
cd ruby-1.9.3-p327/ext/<module folder>
sudo ruby extconf.rb

## reinstall Ruby
sudo make && sudo make install

Monday, November 12, 2012

Converting BeautifulSoup 4 for Python 3


According to BeautifulSoup homepage, the latest release (Beautiful Soup 4.1.3) is compatible for both Python 2.x and Python 3.x. However, to use BS 4 in Python 3.x, you will need to manually convert the code using 2to3.

Windows 7:


Download BS 4.


cd C:\beautifulsoup4-4.1.3
python C:\Python33\Tools\Scripts\2to3.py -w bs4
python setup.py install

**-w option means overwriting the original file


Ubuntu 12.04:


** Setup proxy if you need to.


wget http://www.crummy.com/software/BeautifulSoup/bs4/download/beautifulsoup4-4.1.3.tar.gz
tar -xvzf beautifulsoup4-4.1.3.tar.gz
2to3 -w beautifulsoup4-4.1.3/bs4
cd beautifulsoup4-4.1.3/
sudo python3 setup.py install


To check if BS4 was properly installed, type in your Python 3 interpreter: 

>>> from bs4 import BeautifulSoup

Sunday, November 11, 2012

Setting up Proxy Settings for apt-get and wget in Ubuntu

To check if you have proxy configured in your system:
env | grep proxy

To setup proxy, add the following lines to these environment settings:

1) apt.conf (for apt-get)

sudo gedit /etc/apt/apt.conf

Acquire::http::Proxy "http://username:password@proxy:port";
Acquire::https::Proxy "http://username:password@proxy:port";
Acquire::ftp::Proxy "http://username:password@proxy:port";

2) wgetrc (for wget)

sudo gedit /etc/wgetrc

https_proxy  = http://username:password@proxy:port
http_proxy = http://username:password@proxy:port
ftp_proxy = http://username:password@proxy:port

Uncomment 'use_proxy = on'

Then reboot. sudo reboot


After rebooting your machine, you can now use apt-get and wget normally like sudo apt-get install package-name and wget url

If you don't want to change any configurations and just wanted to use proxy for the entire duration of your session:

For apt-get:
sudo http_proxy='http://username:password@proxy:port' apt-get install package-name

For wget:
export http_proxy='http://username:password@proxy:port' && wget url

OR

export http_proxy=http://proxy:port && wget --proxy-user=user --proxy-password=password url

Things to remember: 
1) Use this format if your proxy doesn't require login credentials: http://proxy:port
2) If your proxy server is Windows-based just like ours, don't forget to add your domain in your login.
ex. http://domain\username:password@proxy:port
3) Character escape your password if it has special characters.
ex. proxy-password=me\@123
4) If after setting up the http_proxy environment variable for wget and the connection still fails, also set up the https_proxy and ftp_proxy variables.

Sharing Files from Windows 7 to Ubuntu 12.04 Via VirtualBox

A coworker inspired me to learn a new OS. Since I'll be using my work machine, I opted to use VM and installed Ubuntu 12.04. Ubuntu 12.04 has Python 2.7 pre-installed. I also installed Ruby 1.9 and Rails 3. I found several posts on how to setup Ruby on Rails (RoR), however, I encountered problems because I'm stuck behind the friggin' corporate proxy. Read my RoR installation misadventure here.

The first thing I did aside from learning some basic commands like shutting down the VM, editing some files, etc via terminal was to research how to share files from Win 7 to Ubuntu. Here's how:

1. Check if you have VirtualBox Guest Additions installed.

Open Terminal (Ctrl + Alt + T)
Type modinfo vboxguest


If VirtualBox Guest Additions is already installed, proceed to step 3.

2. Install VirtualBox Guest Additions. 


3. Go to VM VirtualBox Manger Settings.


Add folder you wanted to share.


From the Visual Box User Manual:

Access to auto-mounted shared folders is only granted to the user group vboxsf, which is created by the VirtualBox Guest Additions installer. Hence guest users have to be member of that group to have read/write access or to have read-only access in case the folder is not mapped writable.


Add user that wants to access shared folder:

Type sudo adduser <username> vboxsf


To remove a user from vboxsf group:

Type sudo deluser  <username> vboxsf


Then reboot for your changes to take effect. Type sudo reboot.


To view your shared folder, go to File System > media.


Check out Liberian Geek and SysProbs for more Windows-Linux tutorials.